Encrypting Email with Thunderbird
Want to enhance your email security by learning how you can use OpenPGP with Thunderbird? With this short primer gets you started in no time encrypting and decrypting emails and verifying that emails you receive are from the people who you expect them to be.
Before you begin
We recommned that you start by reading our OpenPGP Best Practices guide. In particular, you should ensure before you generate a key that you have gone through the OpenPGP Best Practices guide to configure your gpg client to generate a strong key because the defaults that come installed are not optimal.
If you already have a key, you should [[run these checks to ensure that your key is strong → gpg-best-practices#openpgp-key-checks] before continuing.
Install Enigmail and Run the OpenPGP Setup Wizard
Enigmail is a Thunderbird extension that allows you to use OpenPGP encryption with your email.
- (optional) You can let Engimail generate a key pair for you, or you can generate an OpenPGP key pair manually.
- Download Enigmail. Linux users – It’s best to download and install the extension to get the latest one, rather than using one provided by your package manager, which is likely outdated. Thunderbird will automatically install updates to Enigmail in the future.
- Navigate to Tools → Add-ons
- Press the Install… button
- Navigate to the Enigmail .xpi file and select Open. Enigmail will then install.
- Restart Thunderbird if necessary
- Navigate to the new top-menu entry OpenPGP → Setup Wizard
- Select Yes and hit Next
- Choose whether you want to setup OpenPGP for all identities or just for select identities, if you’ve created more than one identity in Thunderbird. If you have multiple identities, choosing to setup OpenPGP for all identities will use one key for all of them.
- Choose whether you want to sign all of your outgoing emails. Signing does not encrypt emails — it places your digital signature on all of your outgoing emails to allow others to verify that you sent the email. It is recommended not to sign all of your outgoing emails as it strongly links you to everything you send out via unencrypted email directly to yourself. It’s best just to encrypt your emails to everyone you know who supports encryption.
- Choose whether you want to encrypt all of your outgoing emails by default. This is not recommended as it is cumbersome if your recipient doesn’t support encryption. You can setup encryption rules later on, which will enable you to always send encrypted emails under conditions you determine.
- Choose to make some changes recommended by OpenPGP. These are all technical configuration changes in Thunderbird that streamline the OpenPGP process and avoid configurations that cause breakages. These are all safe changes, though they do change functionality in some cases, most notably by disabling composing HTML messages.
- Either create a key if you haven’t done so already, or select an existing key to use. If you have multiple keys and/or multiple identities, you may have to make some manual changes later to associate the right key with the right identity.
- Review the proposed changes and hit Next
- If there are no errors, OpenPGP is ready to use. Hit Finish.
Setup OpenPGP Rules
In Thunderbird, the Enigmail extension provides the ability for you to setup rules which Thunderbird will use to automate who will or will not receive encrypted emails from you.
The rule system is pretty powerful and can create a wide array of possible options. This guide will create a rule to always send encrypted email to a specific email address (or multiple email addresses) and operates under the assumption that your emails are unencrypted by default. However, the rule system appears to be powerful enough that if the majority of your contacts use OpenPGP encryption, you can encrypt by default and create a rule that sends unencrypted emails to contacts you have that don’t support encryption.
- Navigate to OpenPGP → Edit Per-Recipient Rules
- Click the Add button on the upper right.
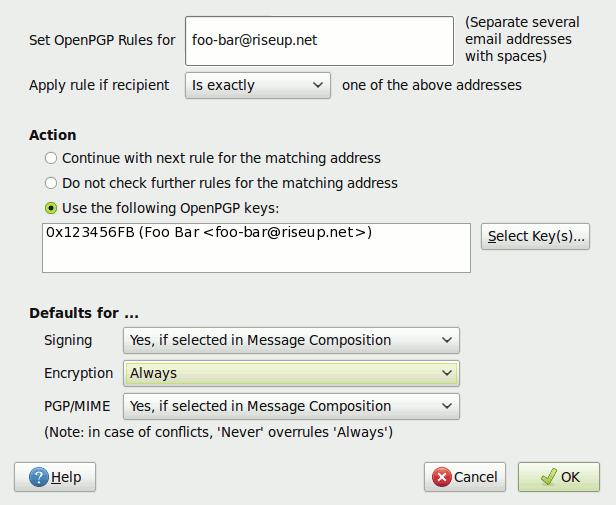
- Enter the email address(es) at the top, separated by spaces if matching multiple email addresses, and is exactly if matching exact addresses or enter matching terms and choose the appropriate matching method. The available matching methods are: is exactly, Contains, Starts with, and Ends with
- Choose the Action to be applied upon matching the rule. For this example, choose Use the following OpenPGP keys: and press the Select Key(s)… button. In the box that pops up from that button, select the OpenPGP key for the person to whom you’re sending email. If you don’t have their public key, press the Download missing keys button, which will search the key servers for the email(s) you entered in the matching box.
- Change Encryption in the Defaults for … section to Always and leave Signing and PGP/MIME as Yes, if selected in Message Composition.
- Press the OK button when you’ve completed the configuration of the rule.

You are now ready to send OpenPGP (GPG) emails to any recipient via Thunderbird and to automatically enable encryption for the chosen recipient in the rule you just created.